
TALES OF BATTLE!
In the depths of deep space 2 opposing fleets move to intercept one another.
In the depths of deep space 2 opposing fleets move to intercept one another.
Firestorm Battle Report
I've chronicled the construction of my Sorylian fleet here over the last month. This is the first battle report for the game.
My son, Jake, and I decided to give the game a go
We decided to play a small game with what we had ready.
Sorylians Dindrennzi
1 x BB 1 x BB
3 x Cruisers 3 x Cruisers
3 x Frigates 3 x Frigates
Mission: Straight up battle royale... Destroy the enemy fleet!
Initial Setup:
We played on a 4 x 6 board with a single moon located in the center of the table.
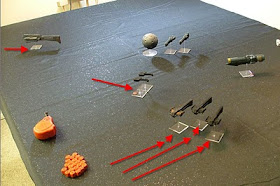
Deployment:
The brave and noble Sorylians:
I deployed with their Battleship in the heart of their formation. The plan was to make it across the board and mix it up with the Dindrenzi at close range.
The Evil puppy hating Dindrenzi:
Positioned his Battleship off to his far left flank. I thought this was a mistake... would time prove me right?

Turn 1: The Sorylians intercept the Dindrenzi com traffic and win the initiative for turn 1 (Thank you Comms card!)
The opening Gambit. The Sorylian Frigates Swoop out and around, firing a linking barrage at one of the Dindrenzi Cruisers. rolling is low... of course but damage is scored! Take that!
The dastardly Dindrenzi respond with advancing their Frigates. Some Impressive markmanship and a flurry of 6s sees two Sorylian frigates blotted from the stars! Shortly thereafter the Dindrenzi Cruisers erase the last Sorylian frigate, I'm already down a squadron!

My Cruisers use Overburn and try to hide behind the small moon (That's no moon, it's a styrofoam ball!) Sadly they don't all make it. Fire from my Battleship and Cruisers manages to destroy 1 Dindrenzi Frigate and land a single point of damage on another. Curses... these gunners need to go back to gunnery school.
The Evil Dindrenzi battleship, commanded by the equally evil Jake, shoots at my exposed Cruiser. Poor guy didn't stand a change

Another flurry of 6s and a critical hit later my Cruiser is in bad shape. The followup torpedo strike from the Battleship finishes off my ship!

My fleet is starting to look less armada-ee... I'm down to three ships and counting.
Turn 2 sees the ships dive into a swirling melee!
My Battleship picks off a crippled Frigate and kills a Dindrenzi Cruiser
Jake's Dindrenzi battleship returns the favor, wrecking one of my cruisers, setting it on fire with only1 point of damage remaining.

Turn 3 - burn baby burn!
Off to a not so great start. I activate my Cruisers and the raging fires consume the damaged one... blast... down another cruiser.
The Dindrenzi, smelling the blood in the water go after my remaining Cruiser with a vengeance.
My last cruiser dies not with a bang, but a whimper...

I benefited from two repair cards in a row over the last 2 turns. Managing to fix a total of 5 points of damage to my battleship. (Much to Jake's displeasure... take that Dindrenzi scum!)
Turn 4 sees my Battleship capping the T on Jake's battleship. Fortunately Jake's shots only cause a single point of Damage. I critical him in return, forcing him to move straight next turn!
the gunners on the port side of my ship finally draw a bead on Jake's pesky last Frigate and blow it to pieces!

Last turn!
My battleship made a graceful yet majestic turn to keep the Dindrenzi in gun sight. With broadside blazing the ships exchange fire, the Sorylian scoring more damage then it received but neither ship landed a knockout blow.
In the distance, like a pack of wolves, Dindrenzi Cruisers rush to protect their flagship.

This marked the 3 hours and we called the game here as a solid victory for the Dindrenzi! Curse their black hearts... and ships.
Final Analysis and thoughts.
Sorylian, the only thing I would have done differently would be to immediately send my Battleship after the Dindrenzi BB. Once (if) I survived the approach, at close range a firefight favors Sorylian Broadsides. I looked for opportunities to board but I was always just a little bit out of range...
The Sorylian Battleship performed well and if the game continued I might have been able to stage a comeback... oh well there is always next time!
The Dindrenzi are interesting. Basically flying guns. Most dangerous to the front. (Whereas Sorylians excel in the broadside) The Dindrenzi Battleship is a dangerous sniper and killed several ships at range. Once up close though he will have a hard time getting his sights on target.
Next time we will try to remember that the Dindrenzi have Mines, the Boarding rules and fighters.
All in all a good first game. Looking forward to getting revenge in the next one!
-Jon
Deployment:
The brave and noble Sorylians:
I deployed with their Battleship in the heart of their formation. The plan was to make it across the board and mix it up with the Dindrenzi at close range.
The Evil puppy hating Dindrenzi:
Positioned his Battleship off to his far left flank. I thought this was a mistake... would time prove me right?

Turn 1: The Sorylians intercept the Dindrenzi com traffic and win the initiative for turn 1 (Thank you Comms card!)
The opening Gambit. The Sorylian Frigates Swoop out and around, firing a linking barrage at one of the Dindrenzi Cruisers. rolling is low... of course but damage is scored! Take that!
The dastardly Dindrenzi respond with advancing their Frigates. Some Impressive markmanship and a flurry of 6s sees two Sorylian frigates blotted from the stars! Shortly thereafter the Dindrenzi Cruisers erase the last Sorylian frigate, I'm already down a squadron!

My Cruisers use Overburn and try to hide behind the small moon (That's no moon, it's a styrofoam ball!) Sadly they don't all make it. Fire from my Battleship and Cruisers manages to destroy 1 Dindrenzi Frigate and land a single point of damage on another. Curses... these gunners need to go back to gunnery school.
The Evil Dindrenzi battleship, commanded by the equally evil Jake, shoots at my exposed Cruiser. Poor guy didn't stand a change

Another flurry of 6s and a critical hit later my Cruiser is in bad shape. The followup torpedo strike from the Battleship finishes off my ship!

My fleet is starting to look less armada-ee... I'm down to three ships and counting.

Turn 2 sees the ships dive into a swirling melee!
My Battleship picks off a crippled Frigate and kills a Dindrenzi Cruiser
Jake's Dindrenzi battleship returns the favor, wrecking one of my cruisers, setting it on fire with only1 point of damage remaining.

Turn 3 - burn baby burn!
Off to a not so great start. I activate my Cruisers and the raging fires consume the damaged one... blast... down another cruiser.
The Dindrenzi, smelling the blood in the water go after my remaining Cruiser with a vengeance.
My last cruiser dies not with a bang, but a whimper...

I benefited from two repair cards in a row over the last 2 turns. Managing to fix a total of 5 points of damage to my battleship. (Much to Jake's displeasure... take that Dindrenzi scum!)
Turn 4 sees my Battleship capping the T on Jake's battleship. Fortunately Jake's shots only cause a single point of Damage. I critical him in return, forcing him to move straight next turn!
the gunners on the port side of my ship finally draw a bead on Jake's pesky last Frigate and blow it to pieces!

Last turn!
My battleship made a graceful yet majestic turn to keep the Dindrenzi in gun sight. With broadside blazing the ships exchange fire, the Sorylian scoring more damage then it received but neither ship landed a knockout blow.
In the distance, like a pack of wolves, Dindrenzi Cruisers rush to protect their flagship.

This marked the 3 hours and we called the game here as a solid victory for the Dindrenzi! Curse their black hearts... and ships.
Final Analysis and thoughts.
Sorylian, the only thing I would have done differently would be to immediately send my Battleship after the Dindrenzi BB. Once (if) I survived the approach, at close range a firefight favors Sorylian Broadsides. I looked for opportunities to board but I was always just a little bit out of range...
The Sorylian Battleship performed well and if the game continued I might have been able to stage a comeback... oh well there is always next time!
The Dindrenzi are interesting. Basically flying guns. Most dangerous to the front. (Whereas Sorylians excel in the broadside) The Dindrenzi Battleship is a dangerous sniper and killed several ships at range. Once up close though he will have a hard time getting his sights on target.
Next time we will try to remember that the Dindrenzi have Mines, the Boarding rules and fighters.
All in all a good first game. Looking forward to getting revenge in the next one!
-Jon
Jon,
ReplyDeleteI am so not into any of this but this blog entry made me smile. :)
you are such a geek. . . in a geeky sort of good way. . . I missed you at grandma's party. . . you should have come. . . it has been way too long
ReplyDelete