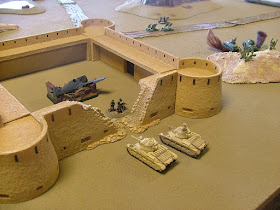
It's been a good time to be a Flames of War player with plenty of releases and fun toys to play with. One of the newest and neatest of the new toys is the Desert Fort... A great and affordable model that we will try to review at a later date. For now I was just excited to get it out on the battlefield.
A trip out to a local game store to meet up with some friends provided me an opponent and a table to play on.
I would be playing Sam and his Early War British Rifle Company while I would be fielding a Vichy French Foreign legion with my fort. The die was cast and the battle would be Fighting Withdraw... not the most logical considering I had a fort but what the heck, right?
I took...
HQ
2 x Legion Infantry platoons
4 x 75mm Arty
4 x 75mm SP AA trucks
3 x 25mm AT platoon
3 x R-35s
Fort with 1 broken wall
While Sam took British Guards Infantry
HQ
3 x Guard Infantry platoons
4 x 25lb guns
2 x Matilda IIs
3 x Universal Carriers.
I placed the fort in the middle of my deployment area, making sure I could deploy my 1 objective inside. Sam deployed the other two Objectives on either side. I'll break up the action on each flank.
My Left Flank: would be defended by a Infantry Platoon backed up by the 75mm Arty.
My Right Flank: R-35s and SP 75mm AA...
Fort: Infantry platoon and 25mm AT guns.
 |
| British Deployment |
For Sam he deployed heavily on my right, with 2 Infantry platoons and the unstoppable Matilda IIs. And set up a diversionary attack on my left with 1 platoon and his Universal Carriers.
Early turns...
 |
| Universal Carriers get too close... |
Sam starts the game aggressively, with everything but the 25lb guns pushing forward. his Universal Carriers push close to the left objective but are dispatched brutally by combined fire of 25mm AT, 75mm AA and Rifle fire.
On the right the British advance over the rocky hill, with Matildas flanking ...
The situation on the left doesn't look bad for the French, with the Universal Carriers destroyed there is only a single Infantry platoon.
 |
| Add caption |
The right hand objective is looking a lot more dicey My R-35s and 75mm AA trucks start taking losses...
The 75mm Artillery causes heavy losses to both of the advancing British Infantry platoons. The combination of Vet arty and the 75mm special rule (re-roll misses) cuts them down.
Fearing the loss of the Objective the Foreign Legion platoon moves out from the fort but is terribly shot up for it's efforts.
The British contest the objective... and I have nothing to stop them! The Brits shot up the French infantry as they tried to leave the fort, the R-35s were gone and there was only a single 75mm AA truck Remaining.....
Through pure luck the 75mm AA truck manages to get within 4 inches of the objective in my turn 5... I would be safe temporarily. The Matildas predicable destroy the Truck but not before the Right objective is pulled of the table!
Not everything is coming up roses for the Brits however as they lose a Infantry platoon to Morale and have another platoon knocked to a couple of teams!
In my next turn I have to pull another platoon, I pull the shattered Infantry platoon in the fort... which had been whittled down to one stand.

The not forgotten left flank... The British advance to keep me busy... but they pay the price as the Frenchmen lay accurate rifle fire from the mountain top.
End Game!
I'd dodged a bullet once but things were still looking grim for the French. Two Angry looking Matildas wanted in... I only had my Company Commander in the fort.!
The Matildas roll over the rubble to enter the Fort.. assaulting the CO. Fortunately the Matilda can't machine gun or crush the wily Frenchman... the CO has to fall back, as he is an independent team! can nothing stop these armored behemoths! ?
The Matildas enter the breach!
In direct fire the 75mm gun bails the trailing Matilda with a lucky hit!
The Last French race towards the fort, but I won't be able to get any teams to contest... However, I can get a team within command distance of my CO, just on the other side of the fort wall...
Now, as part of a Platoon, the CO Assaults! The Matilda machine guns hit twice in defensive fire but the wily Frenchman's luck holds out, in return the CO hits the Matilda!
The Matildas are invulnerable to my infantry, their fists pounding uselessly on the outside of the hull.... but the Matilda platoon fails their moral to counter attack! They have to break off and the Bailed out Matilda is captured!
With that the game ends on the last turn with the battered French army withdrawing successfully 5-2
This was a close fought game, and I had a great string of luck in order to pull off a win. I won 5-2 but Sam almost destroyed 2 platoons (R-35s and an infantry platoon) before I withdrew them.
All in all a great battle and one of the most fun ones I've had in a long while! As always Sam was a great opponent!
Looking forward to playing with this list again!


the CO is an independent team, he can't launch an assault on his own, he must had a platoon to join to do so
ReplyDeleteThat's why the CO had to attach to the infantry platoon outside the fort... Once he attached he could assault as did...
ReplyDeleteAwesome! Thanks!
ReplyDelete